A few months ago, I published a blog post that involved managing Bloodhound CE with Docker Compose:
Purple Teaming AD with BloodHound CE & AD-Miner
Since then, BloodHound CE has seen some pretty significant improvements, including new tools to simplify container management.
Because of this, I wanted to revisit this setup and put together an updated and more simplified guide along the way.
In this post I am going to cover the following:
- Lab Setup
- Installing Docker, BloodHound CE, and AD-Miner on Ubuntu
- Domain data collection with SharpHound from a non-domain-joined Windows host
- Generating reports with AD-Miner
Lab Setup
The lab environment I will be using for this post consists of 3 virtual machines that are all on the same local network:

| Hostname | vCPU | Memory | Hard Disk | Notes |
| VMW-L-DC01 | 4 | 8 GB | 60 GB | Domain – adlab.robwillis.info AD & DNS Roles Installed Domain populated via BadBlood |
| VMW-L-WS | 8 | 16 GB | 50 GB | Collection Host (SharpHound) Non-domain-joined |
| VMW-L-BHCE | 8 | 32 GB | 60 GB | BloodHound CE Containers |
The hosts have all been base prepped, including OS installation, user creation, network configuration, and remote access (RDP/SSH).
Due to the nature of BloodHound’s functionality, it is highly likely you will run into security tools blocking any downloads and/or execution. Make sure you have permission to be performing any testing and plan on making exceptions as needed.
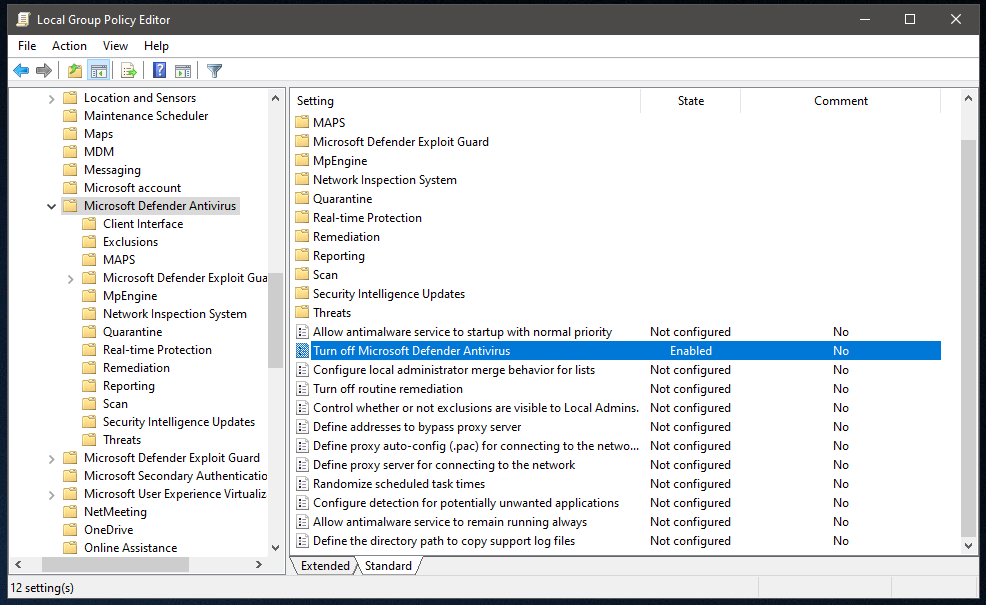
In the case of the Windows collection host that will be running SharpHound, Microsoft Defender has been disabled via Group Policy:
Computer Configuration > Administrative Templates > Windows Components > Microsoft Defender Antivirus – “Turn off Microsoft Defender Antivirus”
Installing Docker
Install the Docker packages:
# apt -y install docker.io docker-compose-v2
Installing BloodHound CE
The quickstart guide for BloodHound CE can be found here:
https://bloodhound.specterops.io/get-started/quickstart/community-edition-quickstart
Create a local BloodHound CE directory and change to it:
# mkdir /opt/bhce && cd /opt/bhce
Download the latest bloodhound-cli package:
# wget https://github.com/SpecterOps/bloodhound-cli/releases/latest/download/bloodhound-cli-linux-amd64.tar.gz
Extract it:
# tar -xvzf bloodhound-cli-linux-amd64.tar.gz
Make sure bloodhound-cli is executable:
# chmod +x bloodhound-cli
Run the installer:
# ./bloodhound-cli install
It looks like everything went correctly and the credentials were generated, but if we browse to http://ipofhost:8080/, the connection fails.
To allow external network access, we’ll need to create a .env file to change the BLOODHOUND_HOST variable from 127.0.0.1 to 0.0.0.0.
Find the docker-compose template:
# find ~ -name docker-compose.yml
/root/.config/bloodhound/docker-compose.yml
The .env file needs to be created in the same directory:
# nano /root/.config/bloodhound/.env
Add the following configuration:
BLOODHOUND_HOST=0.0.0.0
Bring the containers down and then up:
# ./bloodhound-cli down
# ./bloodhound-cli up
The BloodHound CE instance should now be accessible at http://ipofhost:8080, I’ve also created a local DNS entry for http://bhce.robwillis.info:8080.
Installing AD-Miner
AD-Miner Github:
https://github.com/AD-Security/AD_Miner
Install pipx:
# apt -y install pipx
Install AD-Miner:
# pipx install 'git+https://github.com/Mazars-Tech/AD_Miner.git'
Update the PATH environmental variable:
# pipx ensurepath
Reload the shell and verify AD-Miner is installed:
# AD-miner --help
Make a reporting directory and change to it:
# mkdir /opt/bhce/reports && cd /opt/bhce/reports
Domain Data Collection with SharpHound
On the Windows host, download SharpHound from the BloodHound CE Server:

Use the following commands to expand the archive and take a look at SharpHounds help:
PS > cd .\Downloads\
PS > Expand-Archive .\sharphound-v2.8.0.zip
PS > cd .\sharphound-v2.8.0\
PS > .\Sharphound.exe --help
If this were a domain-joined system, SharpHound could be executed like this:
PS > .\SharpHound.exe --memcache --collectionmethods dconly --domain adlab.robwillis.info
In this case, the Windows collector host is not on the domain, but the host does have network access and we also have a valid set of credentials for a domain user.
Pinging the domain controller host succeeds, but fails on the domain:
PS > ping -a 192.168.90.75
Pinging 192.168.90.75 with 32 bytes of data:
Reply from 192.168.90.75: bytes=32 time<1ms TTL=128

PS > ping adlab.robwillis.info
Ping request could not find host adlab.robwillis.info. Please check the name and try again.
Identify the local network adapter:
PS > Get-NetAdapter
Update the network adapter DNS to point to the domain controller:
PS > Get-DnsClientServerAddress -InterfaceAlias "Ethernet0"
PS > Set-DnsClientServerAddress -InterfaceAlias "Ethernet0" -ServerAddresses ("192.168.90.75", "192.168.90.1")
Pinging the domain now works:
PS > ping adlab.robwillis.info
Pinging adlab.robwillis.info [192.168.90.75] with 32 bytes of data:
Reply from 192.168.90.75: bytes=32 time<1ms TTL=128
Launch a command prompt using the domain user credentials:
PS > runas /netonly /user:adlab.robwillis.info\bit_rot cmd.exe
Verify the access:
C:\ > net view \\adlab.robwillis.info\
Shared resources at \\adlab.robwillis.info\

Share name  Type  Used as  Comment
-------------------------------------------------------------------------------
NETLOGON    Disk           Logon server share
SYSVOL      Disk           Logon server share
The command completed successfully.
Start the SharpHound collection:
C:\ > .\SharpHound.exe --memcache --collectionmethods dconly --domain adlab.robwillis.info
The output will be a zip in the running directory:
C:\ > dir
 Directory of c:\Users\Administrator\Downloads\sharphound-v2.8.0

11/21/2025  02:20 PM    DIR          .
11/21/2025  02:15 PM    DIR          ..
11/21/2025  02:20 PM           637,787 20251121142004_BloodHound.zip
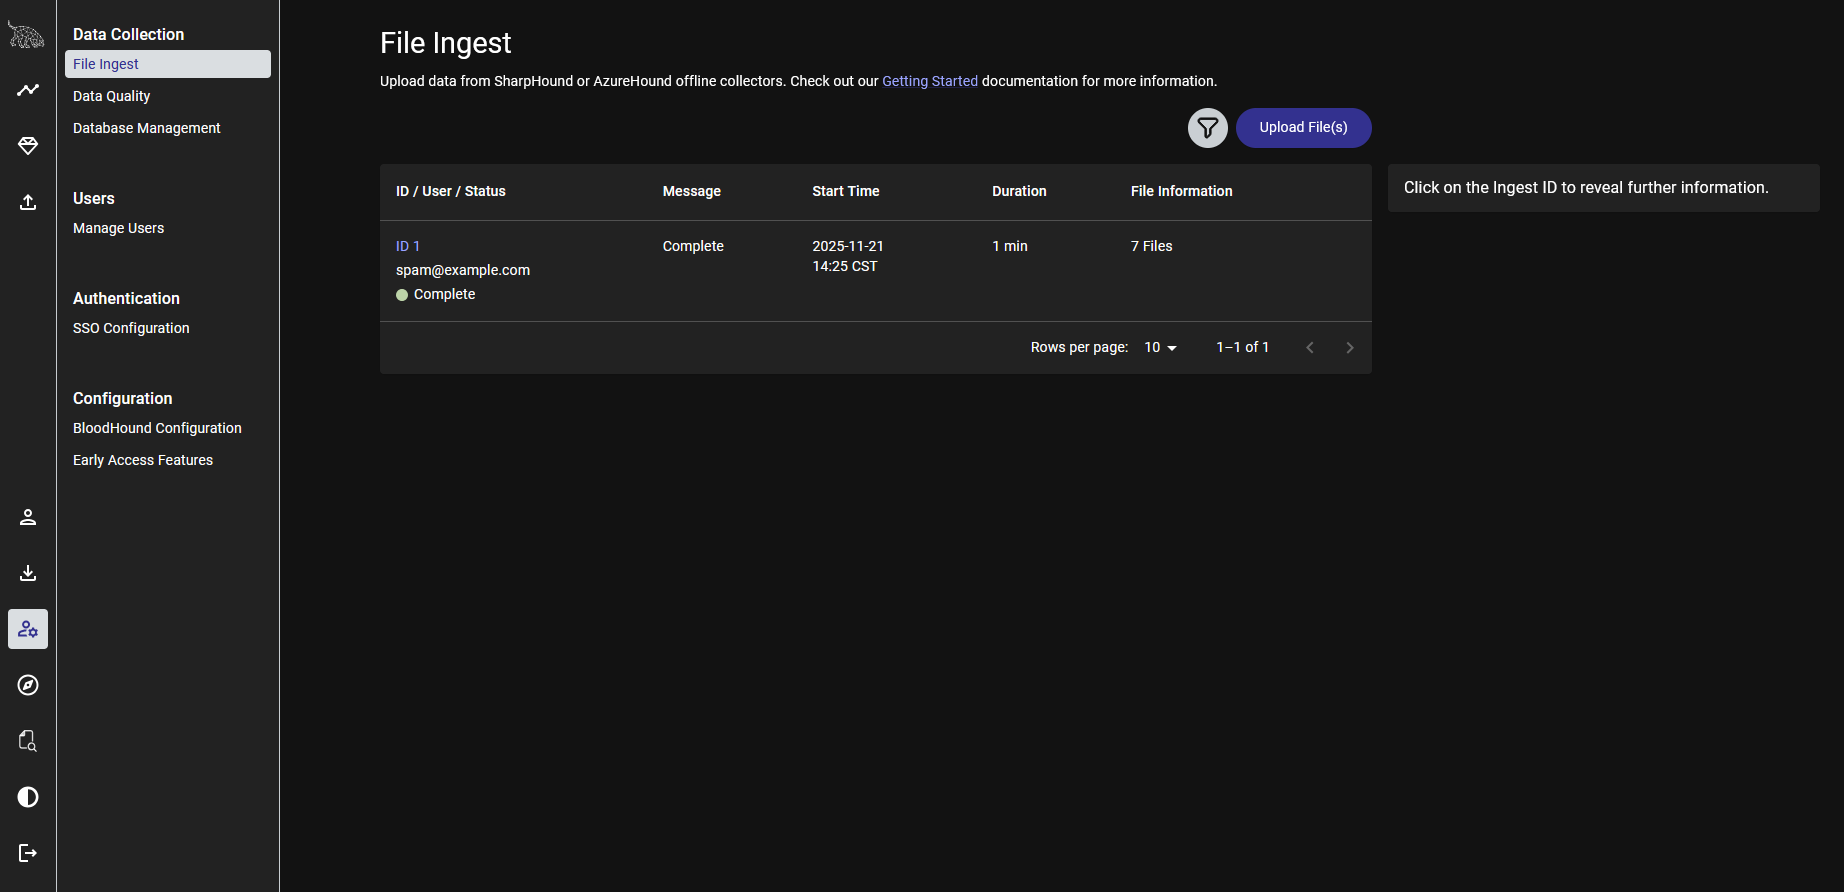
Upload the zip in the BloodHound web interface under Administration > File Ingest:
Generating Reports With AD-Miner
Generate a report:
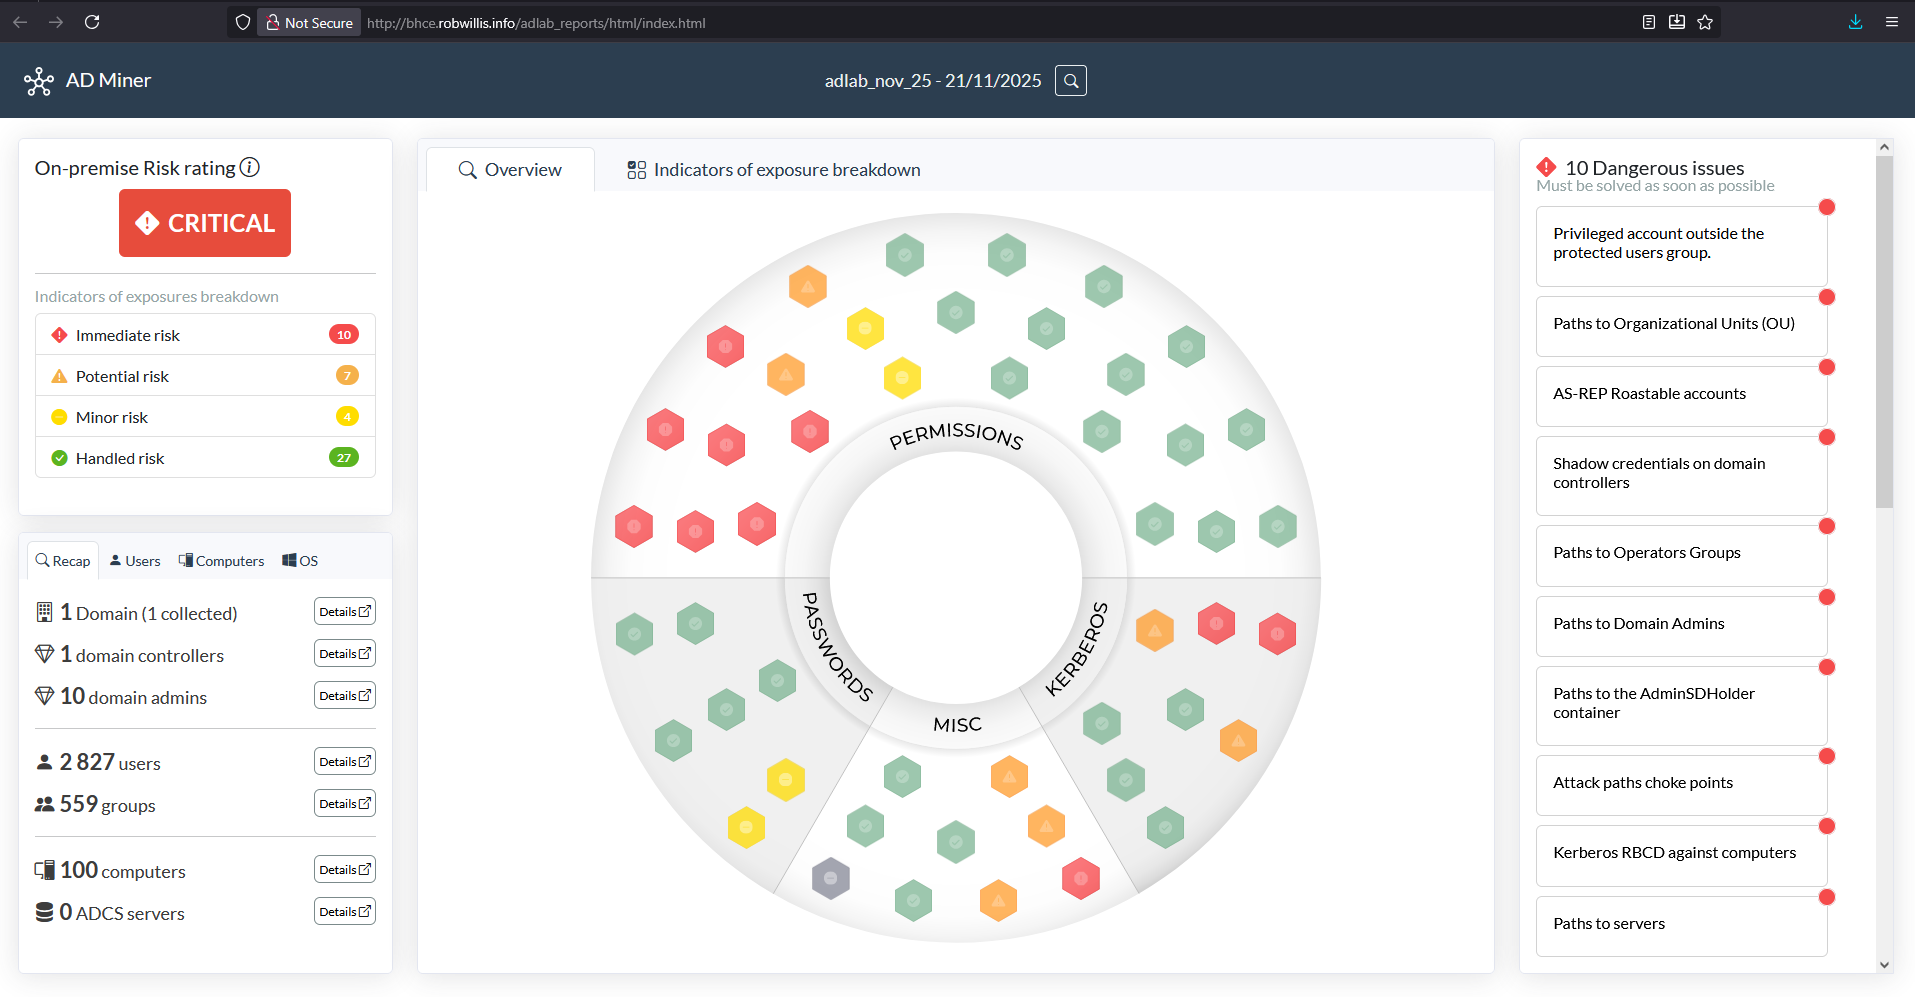
# AD-miner -c -cf adlab_nov_25 -u neo4j -p bloodhoundcommunityedition
The output will be a web-based report as a series of folders and html documents.
To simplify distribution, compress the folder down to a single file:
# tar -zcvf adlab_nov_25.tar.gz render_adlab_nov_25/
Now we need a way to move the file off of the Bloodhound server, this can be SSH/SCP, FTP, whatever you are comfortable with.
Since this is a lab, and the report is web-based, let’s try serving the content up using Apache.
Install Apache:
# apt -y install apache2
Make a report directory in the Apache root:
# mkdir /var/www/html/adlab_reports/
Copy the compressed report:
# cp adlab_nov_25.tar.gz /var/www/html/adlab_reports/
Copy the entire report folder:
# cp -r /opt/bhce/reports/render_adlab_nov_25/* /var/www/html/adlab_reports/
Now to browse to the report at http://ipofhost/adlab_reports/, Apache should be running on the default port 80:
Repeating The Process
-
Run SharpHound:
PS > runas /netonly /user:adlab.robwillis.info\bit_rot cmd.exe
C:\ > .\SharpHound.exe --memcache --collectionmethods dconly --domain adlab.robwillis.info
- Upload SharpHound output to BloodHound CE server.
-
Create report with AD-Miner:
# AD-miner -c -cf adlab_nov_25 -u neo4j -p bloodhoundcommunityedition
# tar -zcvf adlab_nov_25.tar.gz render_adlab_nov_25/