I’ve been looking for a OneNote alternative for a few years now, but haven’t been able to find anything that combines the same basic functionality with a simple, clean interface. As I’m increasingly moving away from Microsoft products, I realized it was time to find a dedicated solution and stick with it. I’m excited to say I think I’ve finally found something that fits the bill.
Requirements for a note-taking solution:
- Simple and intuitive interface – Prioritize the workspace area, minimizing unnecessary menus
- Clean organization – Must allow for easy management of potentially years’ worth of structured data
- Excel at note-taking – The primary focus should be on entering and managing text, headers, tables, lists, etc
- Minimal interference – “Features” like automatic capitalization and automatic source formatting can be a nightmare when copying and pasting commands and code
- Easily accessible by one user from multiple hosts – I currently keep my OneNote Notebook on a centralized network share, with each host having OneNote installed
- Easy server management – If a server is needed, it should be simple to deploy, update, and backup
- Privacy – Local storage only, no/minimal data collection
- Secure storage – Not required, but nice to have for potentially sensitive information
- Open source preferred
- Dark mode support
What Is Trilium Notes?
Trilium Notes is an open-source note-taking solution that allows you to work offline on your desktop, or synchronize your notes with a self-hosted server for convenient, centralized access.
- Main site – https://triliumnotes.org/
- GitHub – https://github.com/TriliumNext/Trilium
- Docs – https://docs.triliumnotes.org/user-guide/
Features
Client & Server
- Desktop Clients
- Windows, Linux, macOS
- Self-Hosted Server
- Docker container
- Sync & centralized storage
- Web client
Application
- Beautiful, highly functional interface with dark mode built-in
- Fully featured text editor
- Easy to navigate and manipulate hierarchical structure
- Note labels and relationships
- Multiple workspaces
- Revision/history
- Synchronization (requires server)
- Protected/encrypted notes
- Automatic local backups (daily, weekly, monthly)
- Search
- Canvas
- Mermaid diagrams
- Mind Maps
- Web view for sharing notes
- Split view
- Markdown support
- Much more…
Additional Notes
- HTTPS is supported, but not enabled by default
- Single user design, password only authentication (web client)
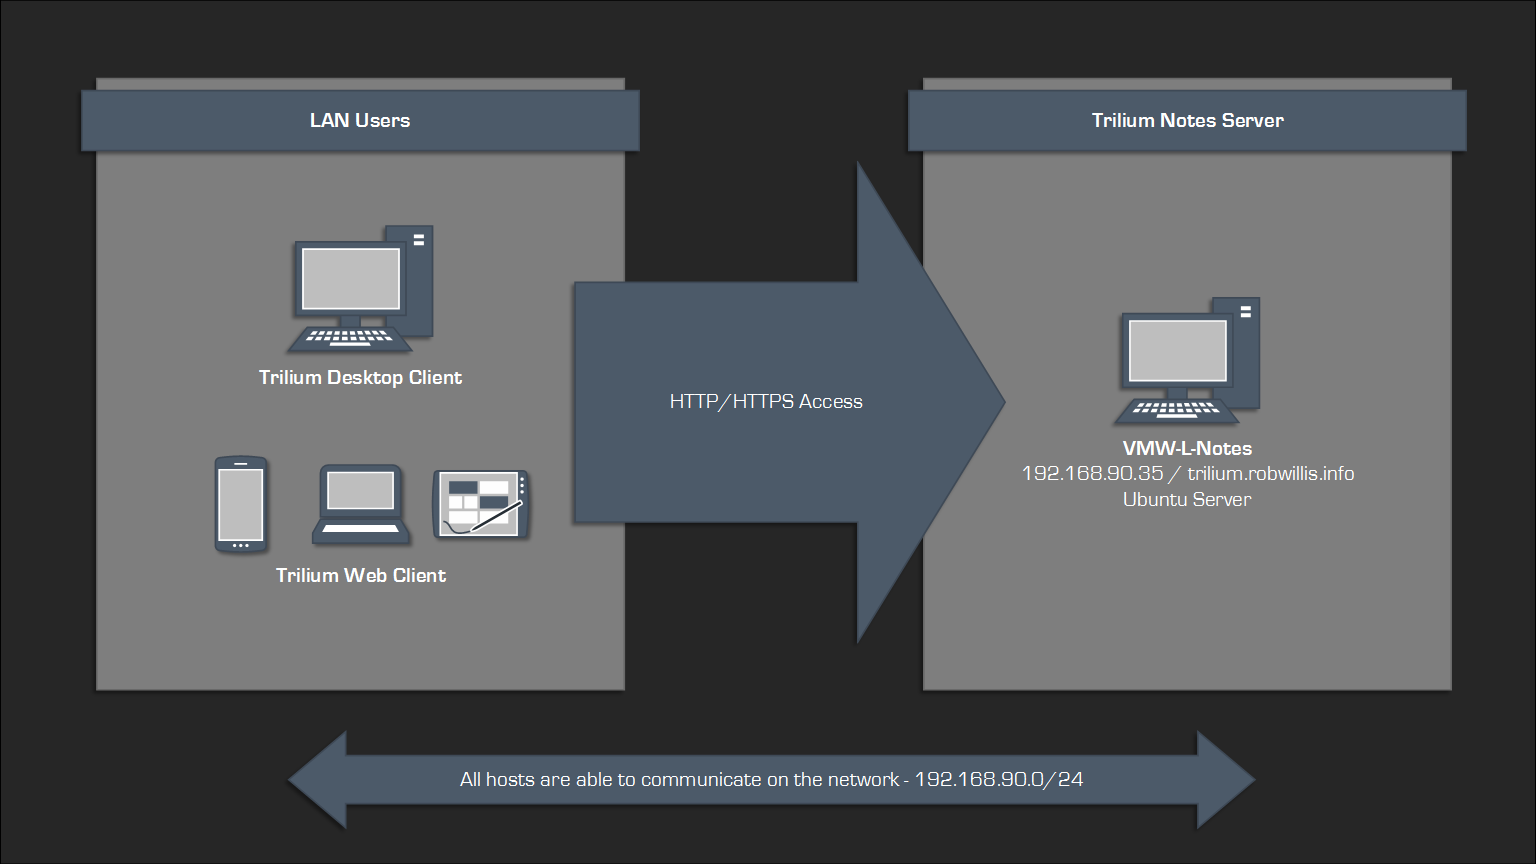
Lab Setup
The lab environment I will be using for this post will consist of a single Ubuntu Server virtual machine hosting the Trilium Notes container:
| Hostname | vCPU | Memory | HDD | Notes |
| VMW-L-Notes01 | 3 | 4 GB | 40 GB |
Trilium Notes container IP – 192.168.90.35 DNS – trilium.robwilis.info Low resource requirements |
The host has been base prepped, including OS installation, user creation, network configuration, and remote access (SSH).
Server Setup
Docker Installation
Install Docker:
# apt -y install docker.io docker-compose-v2
Trilium Notes Server Installation
Make a home for Trilium:
# mkdir /opt/trilium && cd /opt/trilium
There are several ways to run Trilium with Docker, but I prefer using Docker Compose.
Pull down the Docker Compose configuration:
# wget https://raw.githubusercontent.com/TriliumNext/Trilium/master/docker-compose.yml
Edit the docker-compose.yml:
# nano docker-compose.yml
Make the following modifications:
- Change the image tag to :stable
- Update ports: to – ‘0.0.0.0:80:8080’
- Note the TRILIUM_DATA_DIR
The final docker-compose.yml should look something like this:
# Running `docker-compose up` will create/use the "trilium-data" directory in the user home
# Run `TRILIUM_DATA_DIR=/path/of/your/choice docker-compose up` to set a different directory
# To run in the background, use `docker-compose up -d`
services:
  trilium:
    # Optionally, replace `latest` with a version tag like `v0.90.3`
    # Using `latest` may cause unintended updates to the container
    image: triliumnext/trilium:stable
    # Restart the container unless it was stopped by the user
    restart: unless-stopped
    environment:
      - TRILIUM_DATA_DIR=/home/node/trilium-data
    ports:
      # By default, Trilium will be available at http://localhost:8080
      # It will also be accessible at http://<host-ip>:8080
      # You might want to limit this with something like Docker Networks, reverse proxies, or>
      # however be aware that using UFW is known to not work with default Docker installation>
      # https://docs.docker.com/engine/network/packet-filtering-firewalls/#docker-and-ufw
      - '0.0.0.0:80:8080'
    volumes:
      # Unless TRILIUM_DATA_DIR is set, the data will be stored in the "trilium-data" directo>
      # This can also be changed with by replacing the line below with `- /path/of/your/choic>
      - ${TRILIUM_DATA_DIR:-~/trilium-data}:/home/node/trilium-data
      - /etc/timezone:/etc/timezone:ro
      - /etc/localtime:/etc/localtime:ro
Start the container in detached mode:
# docker compose up -d
Initialization & Sync
Access the server by browsing to http://IP_or_Hostname:Port.
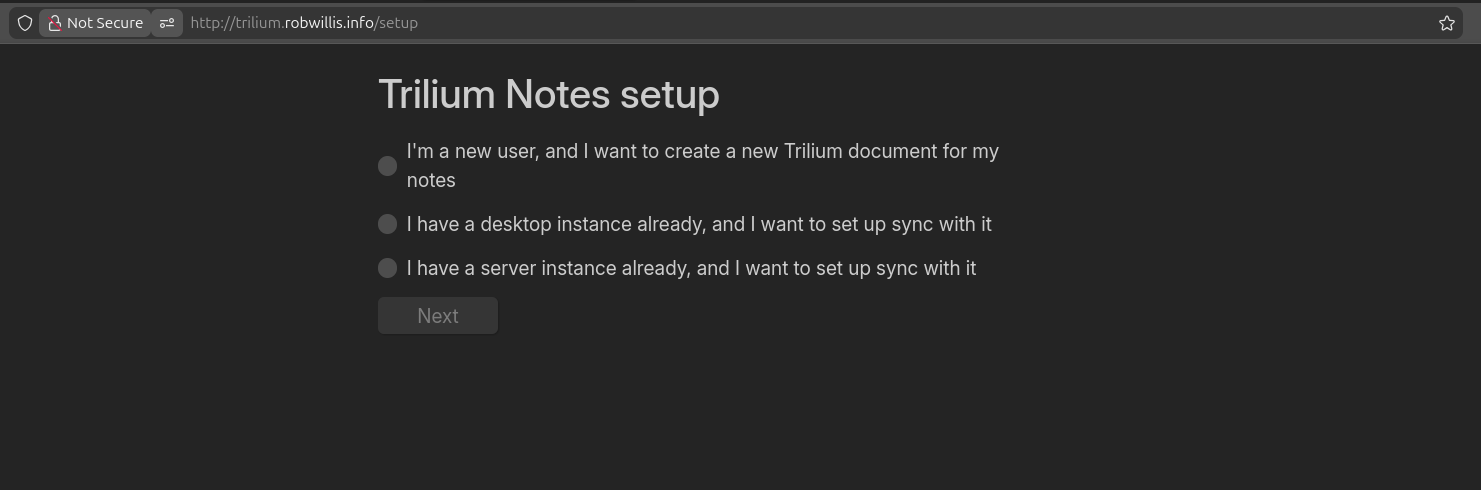
You’ll have three options to initialize the instance:
- New user, new Trilium document
- Sync desktop to server
- Sync server to server
If this is a new document, you will be prompted to create a password.
To sync the desktop client to the server, go to Settings > Options > Sync, use http://IP_or_Hostname:Port of the Trilium server as the server instance address:
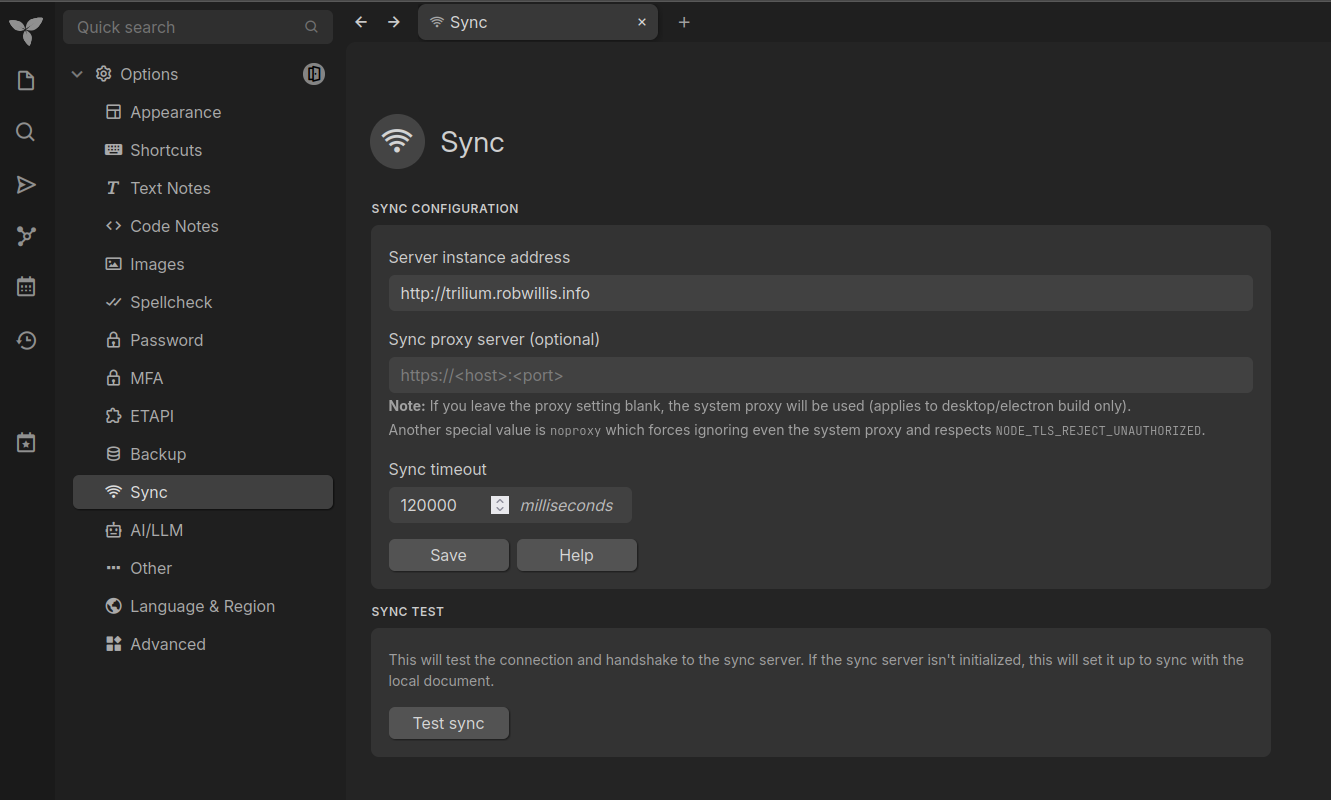
Click “Test sync” to verify the connection.
Server Management
Basics
View the running containers:
# docker ps
Start/Stop/Restart the container services:
# docker compose start
# docker compose stop
# docker compose restart
View the locally available docker images:
# docker images
View the container logs:
# docker compose logs
Reset the container back to its original state by bringing the container down with “-v” to wipe the volume, and then delete the data directory:
# docker compose down -v
# rm rf ~/trilium-data/
Note: Disable any sync clients before running the wipe commands, or the data may be unintentionally restored.
Updates
To update the Trilium container:
# docker compose pull
Bring the container down and then back up:
# docker compose down
# docker compose up -d
Backups
Trilium includes a built-in backup solution for daily, weekly, and monthly backups.
You can find these settings under Settings > Options > Backups.
Data is stored in the “trilium-data” directory within the root user’s home directory, as defined in the Docker Compose file. This directory contains a “backup” folder holding local backups:
# find ~ -name "trilium-data" 2>/dev/null
/root/trilium-data
# ls -la /root/trilium-data/backup/
total 7460
drwx------ 2 bit_rot bit_rot    4096 Jan 12 09:39 .
drwxr-xr-x 5 bit_rot bit_rot    4096 Jan 13 08:50 ..
-rw-r--r-- 1 bit_rot bit_rot 2543616 Jan 12 09:39 backup-daily.db
-rw-r--r-- 1 bit_rot bit_rot 2543616 Jan  2 13:39 backup-monthly.db
-rw-r--r-- 1 bit_rot bit_rot 2543616 Jan  6 09:39 backup-weekly.db
Restores
The following steps will restore a Trilium instance.
- Stop the Trilium container:
# docker compose down
- Delete the following files:
- ~/trilium-data/document.db
- ~/trilium-data/document.db-wal
- ~/trilium-data/document.db-shm
# rm -f ~/trilium-data/document.db*
-
Copy and rename ~/trilium-data/backup/backup-*.db to ~/trilium-data/document.db:
# cp ~/trilium-data/backup/backup-daily.db ~/trilium-data/document.db
- Make sure that the file is writable:
# chmod 600 document.db
- Start the container:
# docker compose up -d
Enabling HTTPS
If you don’t already have a certificate and key, you can use the following command to generate a self-signed certificate and key in the ~/trilium-data directory:
# openssl req -x509 -nodes -days 3650 -newkey rsa:4096 -keyout ~/trilium-data/trilium.key -out ~/trilium-data/trilium.crt
Command breakdown:
- -x509 – Self-signed
- -nodes – Do not encrypt the key with a passphrase
- -days – Valid for 3650 days (10 years)
- -newkey – RSA with a key length of 4096
- -keyout – Key file
- -out – Certificate file
Edit the Trilium config.ini:
# nano ~/trilium-data/config.ini
Make the following modifications:
- https=true
- certPath=/home/node/trilium-data/trilium.crt
- keyPath=/home/node/trilium-data/trilium.key
Update the port setting in /opt/trilium/docker-compose.yml to use HTTPS/443:
# nano docker-compose.yml
Update ports: to – ‘0.0.0.0:443:8080’.
Bring the container down and then back up:
# docker compose down
# docker compose up -d
Check the container logs:
# docker compose logs
Additional Notes
- The Trilium desktop clients will not trust a self-signed certificate by default and will require a bypass:
https://docs.triliumnotes.org/user-guide/setup/server/https
Conclusion
When I started this project, I wanted to avoid another self-hosted server mainly just to limit complexity and maintenance overhead. I’m honestly surprised by how much I’ve come to like this setup. I normally prefer a desktop client for the speed and responsiveness, but the web client works really well, and it’s nice not to have to install an application on every device I use just to access my notes.
I actually used Trilium to capture all of the ideas and notes for this blog. I love it, it’s just so easy to use, and it’s incredible that it’s also free and open source.
I’m telling you, if you take a lot of notes, give this one a try.